Building and publishing a Clojure library from scratch with Slim
April 13, 2025In this article, I'll show you how to build a Clojure library and publish it to Clojars with minimal effort, time, and configuration. We'll use Slim, a build tool I recently released that simplifies the process of building Clojure projects.
Publishing an Existing Library
If you have an existing library and want to publish it to Clojars, Slim makes this process straightforward with minimal configuration.
Assuming you have a deps.edn file in your project root, simply add Slim to your deps.edn file:
{:aliases
 {:build {:deps {io.github.abogoyavlensky/slim {:mvn/version "0.3.2"}
                 slipset/deps-deploy {:mvn/version "0.2.2"}}
          :ns-default slim.lib
          :exec-args {:version "0.1.0"
                      :lib io.github.githubusername/libraryname
                      :url "https://github.com/githubusername/libraryname"
                      :description "Library description"
                      :developer "Your Name"}}}}
You just need to edit the :exec-args map with your library details.
And that's it! You can now set up environment variables CLOJARS_USERNAME and CLOJARS_PASSWORD, and then run clojure -T:build deploy to publish your library to Clojars.
If you prefer to publish a snapshot version first (recommended for testing), you can run clojure -T:build deploy :snapshot true. For additional options, check the documentation.
Publishing a New Library
What if you have just an idea for a new library and want to implement and publish it to Clojars? Recently, I've built several small libraries and created a template to streamline this process.
Meet clojure-lib-template: a template for creating new Clojure libraries with several advantages:
- Minimalistic and easy to understand
- Built-in GitHub Actions workflows for CI/CD with publishing to Clojars
- Comprehensive development tooling setup (linting, formatting, deps versions, testing)
- Preconfigured build and deployment to Clojars using Slim
- MIT License by default
Example Library Idea
For demonstration purposes, let's implement a simple library with a single function that finds an available port on the local machine for a server. We'll call it freeport.
Creating a New Project
First, we need to create a project structure. If you don't have deps-new installed yet, you can install it with:
clojure -Ttools install-latest :lib io.github.seancorfield/deps-new :as new
Then create a new project:
clojure -Sdeps '{:override-deps {org.clojure/clojure {:mvn/version "1.12.0"}}}' -Tnew create :template io.github.abogoyavlensky/clojure-lib-template :name io.github.yourusername/freeport
Note: Replace yourusername with your actual GitHub username, or change the entire prefix if you're hosting your project on a different service.
If you already have Clojure version 1.12.x installed, you can skip the first argument and simply run:
clojure -Tnew create :template io.github.abogoyavlensky/clojure-lib-template :name io.github.yourusername/freeport
This command creates a new project named freeport in your current directory with the following structure:
├── .clj-kondo/            # Clojure linting configuration
├── .github/               # GitHub Actions workflows and configurations
├── dev/                   # Development configuration directory
│   └── user.clj           # User-specific development configuration
├── src/                   # Source code directory
│   └── freeport           # Main namespace directory
│       └── core.clj       # Main namespace file
├── test/                  # Test files directory
│   └── freeport           # Test namespace directory
│       └── core_test.clj  # Test namespace file
├── .cljfmt.edn            # Formatting configuration
├── .gitignore             # Git ignore rules
├── .mise.toml             # mise-en-place configuration with system tools versions
├── bb.edn                 # Babashka tasks configuration
├── deps.edn               # Clojure dependencies and aliases
├── LICENSE                # License file
├── CHANGELOG.md           # Changelog file
└── README.md              # Project documentation
Let's start by installing system dependencies:
mise trust && mise install
mise-en-place is an optional tool that helps conveniently manage system tool versions. You can skip this step and install dependencies manually if preferred - just consult the .mise.toml file for the required versions.
Next, initialize a git repository and create your first commit:
git init
git add .
git commit -am 'Initial commit'
Verify that everything is working correctly by running the checks for linting, formatting, outdated dependencies, and tests:
bb check
Commit any changes that might have occurred after formatting or dependency checks.
Adding Implementation
Now let's implement the core functionality for our library.
Open src/freeport/core.clj and add the following code:
(ns freeport.core
  (:import (java.net ServerSocket)))

(defn get-freeport
  []
  (with-open [socket (ServerSocket. 0)]
    (.getLocalPort socket)))
Next, let's write tests for our implementation. Open test/freeport/core_test.clj and add:
(ns freeport.core-test
  (:require [clojure.test :refer :all]
            [freeport.core :as core])
  (:import [java.net ServerSocket]))

(defn port-free? [port]
  (try
    (with-open [_socket (ServerSocket. port)]
      true)
    (catch Exception _
      false)))

(deftest test-port-is-free-ok
  (let [port (core/get-freeport)]
    (is (true? (port-free? port)))
    (is (<= 1024 port 65535))))
This test verifies that the port returned is actually available and falls within the standard range of 1024-65535. Run the tests and other checks again to ensure everything passes:
bb check
Once everything looks good, commit your changes:
git commit -am 'Add freeport implementation'
Publishing to Clojars
Before publishing, update the library details in your deps.edn file. You'll need to modify the :description and :developer name:
{;...
 :aliases
 {:build {:deps {io.github.abogoyavlensky/slim {:mvn/version "0.3.2"}
                 slipset/deps-deploy {:mvn/version "0.2.2"}}
          :ns-default slim.lib
          :exec-args {:version "0.1.0"
                      :lib io.github.yourusername/freeport
                      :url "https://github.com/yourusername/freeport"
                      :description "TODO: Add description"
                      :developer "Your Name"}}}}
Next, set up your Clojars credentials as environment variables:
export CLOJARS_USERNAME=yourusername
export CLOJARS_PASSWORD=yourpassword
Now you can publish a snapshot version to Clojars for testing:
bb deploy-snapshot
After testing the snapshot version in your project and confirming everything works as expected, you can publish a release version:
bb deploy-release
Publishing from GitHub Actions
While deploying from your local machine works well, automating the process through CI/CD is even better. The template already includes GitHub Actions workflows configured for this purpose.
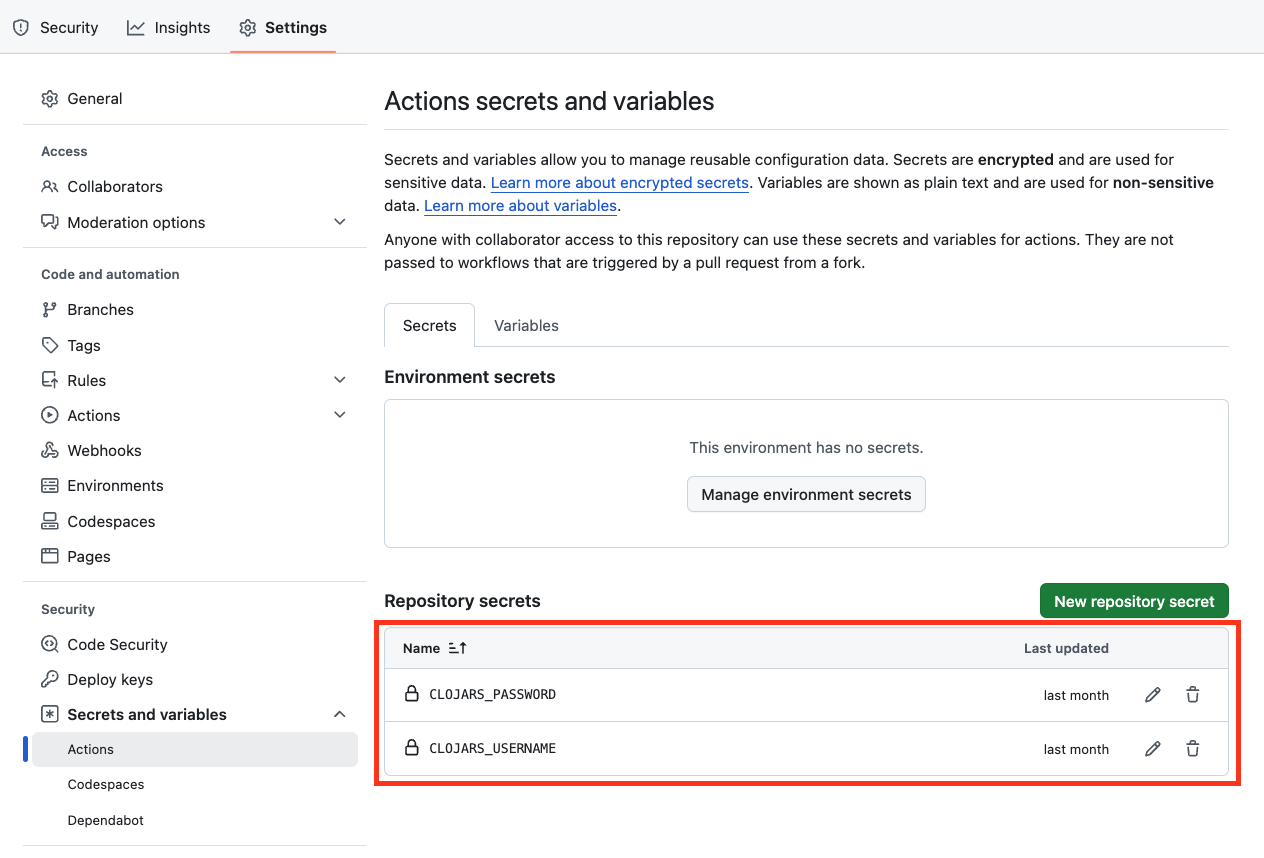
All you need to do is set up the environment variables CLOJARS_USERNAME and CLOJARS_PASSWORD in your GitHub repository settings:
The workflow is designed to:
- Publish a snapshot version on every push to the main branch
- Publish a release version on every tag push
When you push a new commit to the main branch, the workflow will run automatically and publish a snapshot version to Clojars within a minute.
When your library is ready for a new version release, update the version number in your deps.edn file:
{;...
 :aliases
 {:build {;...
          :exec-args {:version "0.1.1"
                      ;...
                      }}}}
After committing and pushing these changes to the main branch, create a new git tag. You can do this manually or use the provided command:
bb release
This command is essentially a shortcut for git tag and git push. It creates a new tag with the latest version from your deps.edn file and pushes it to the remote repository, triggering the release workflow.
Summary
In this article, we've covered the complete process of building and publishing Clojure libraries - from using Slim with existing libraries to creating new ones from scratch with the clojure-lib-template.
I hope you found this guide useful and that it helps streamline your workflow for the next Clojure library you build!