Designing a database schema for a budget tracker with Automigrate
March 5, 2024Today, I will guide you through the step-by-step process of creating a database schema for a simple app in Clojure using Automigrate. Automigrate is a Clojure tool designed to streamline the modeling and modification of database schemas through EDN-structures and auto-generated migrations. The aim of this article is to demonstrate the fundamental features of Automigrate through an example that closely resembles a real-world application.
Auto-generated migrations offer significant advantages when designing a database schema for an application. This declarative approach allows for rapid modifications to the schema based on changes in the models, eliminating the need to manually describe the changes. Instead, you simply define the desired state, and Automigrate handles the rest. This focus on the domain logic of the app means you can maintain a clear understanding of the database schema without needing a direct connection to the database. Moreover, in situations where you wish to experiment with different solutions locally, auto-generated migrations offers backward migrations, enabling you to apply alternative modifications with ease.
Currently, Automigrate supports only PostgreSQL (with plans to support other databases). For the purposes of this article, we will utilize PostgreSQL.
A project idea
Suppose we aim to create a simple personal budget tracker application. The main goal is to monitor expenses and income while maintaining an accurate balance. We would like to have multiple budgets per user with settings such as currency and a set of custom transaction categories. We want to be able to assign a category to transaction.
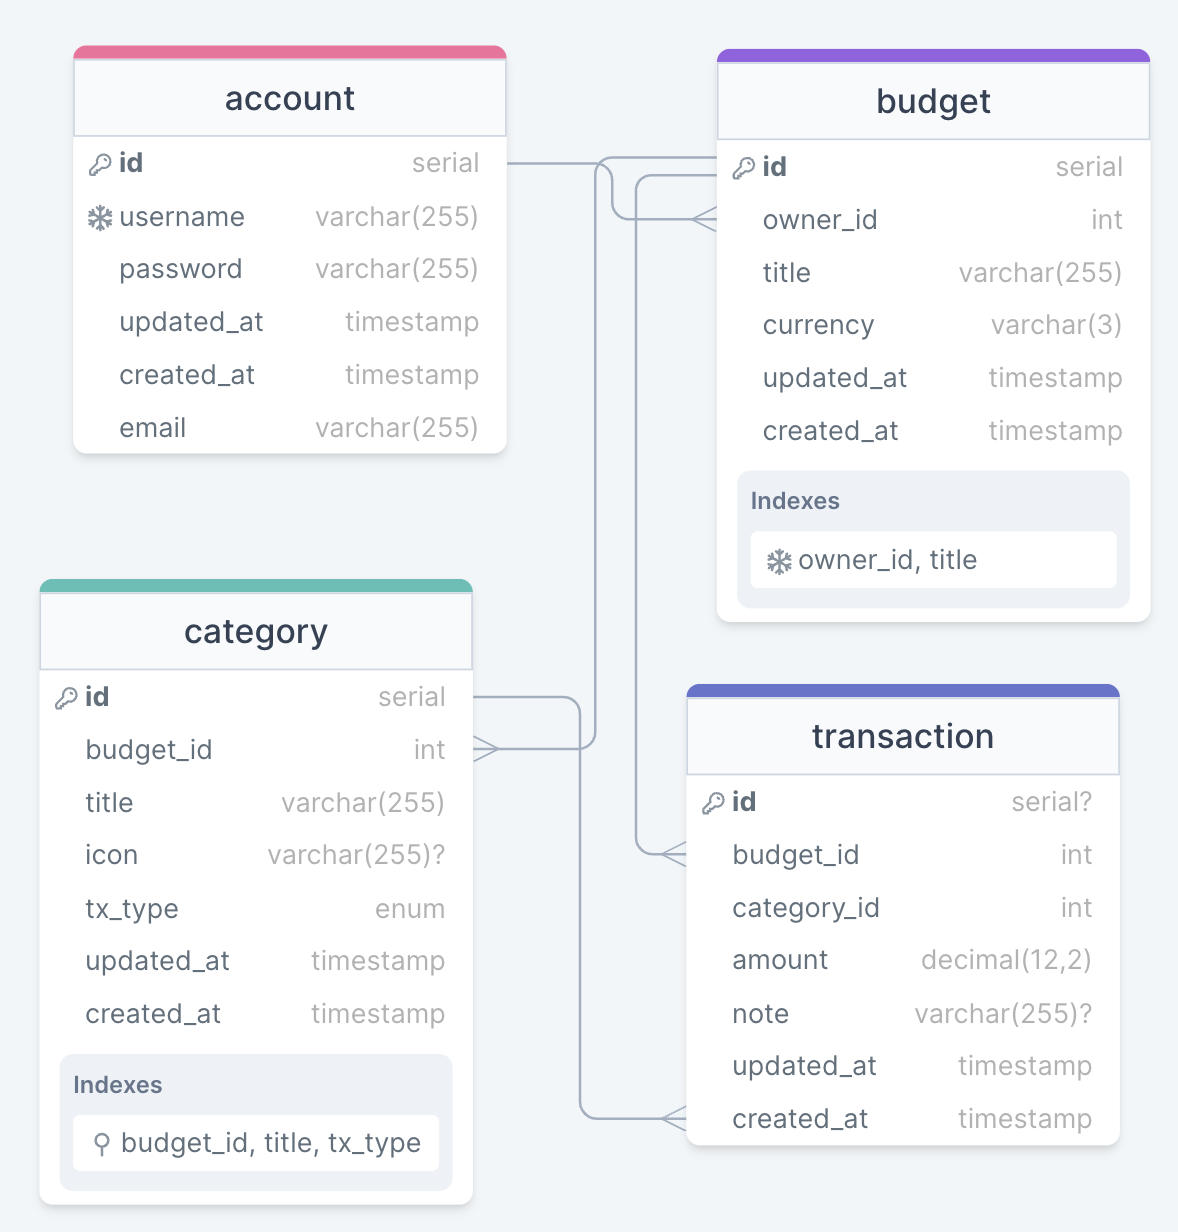
From a database perspective, we would likely require the following entities: account (or users), budget, transaction and category. Simple relationships between database entities can be represented by following diagram:
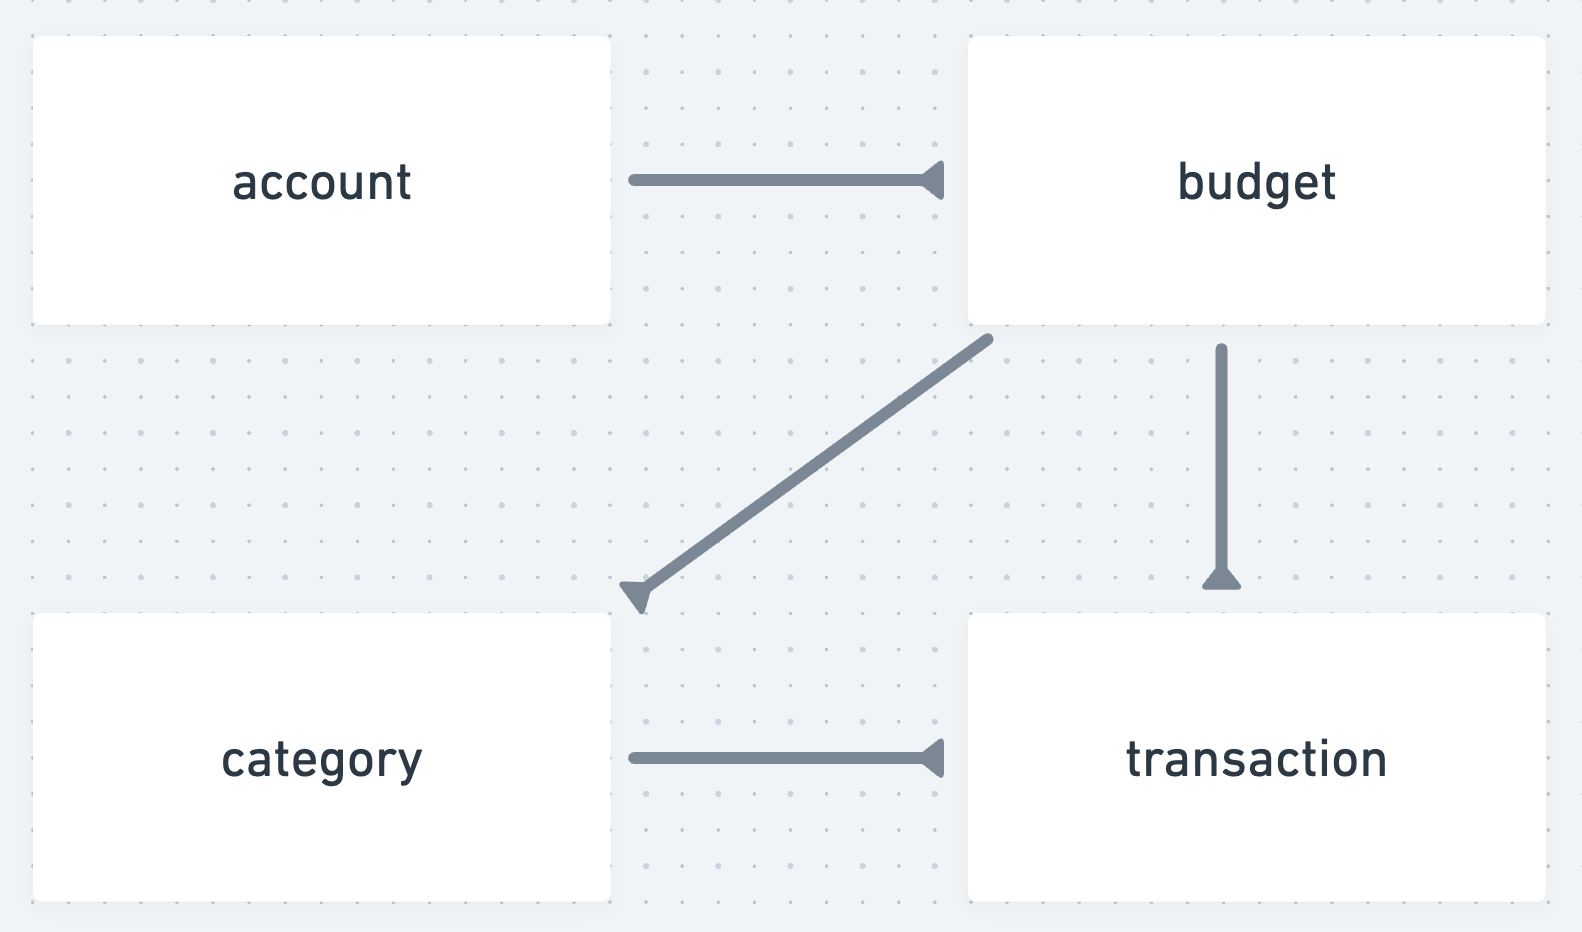
We will incrementally add more detail to these entities and explore how Automigrate facilitates this process.
Setup
Clone example project
To simplify the process of reproducing steps from this article you can use the example setup directory from the tool's repository.
$ git clone git@github.com:abogoyavlensky/automigrate.git
...

$ cd automigrate/examples/empty
The directory already contains a minimal setup, including an empty models.edn file. To proceed, you'll need Docker installed on your local machine, which can be done by following the official guide.
Note: as of the time this article was written the latest version of Automigrate is 0.3.2.
Run database
Following the initial setup, let's verify that we can execute Automigrate commands. First, we'll build the Docker image of the demo service using Docker Compose and then run the database service:
$ docker compose build demo
$ docker compose up -d db
Next, let's confirm that we can get an empty list of migrations:
$ docker compose run --rm demo clojure -X:migrations list
Migrations not found.
Now that we're set up, we're ready to follow all the commands presented in this guide. For convenience, let's access a shell inside the container that contains the example project:
$ docker compose run --rm demo /bin/bash
All subsequent commands will be executed within the container of the demo service.
Database viewer (optional)
Adminer is a convenient database management tool that we can use to inspect actual database schema changes:
$ docker compose up -d adminer
Ensure that port 8081 is available to run the web interface for the database. Next, verify that you can log into Adminer and view the empty state of the database.
Use demo as the value for the username, password, and database name.
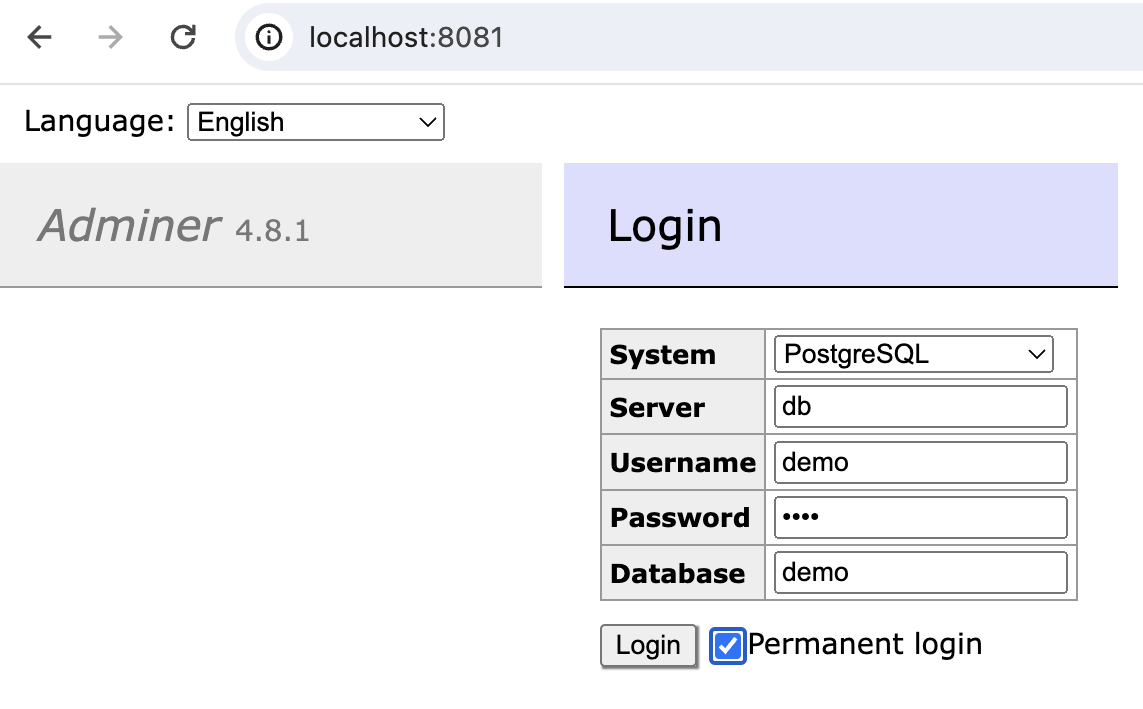
Now we can verify that database is empty:

A first model
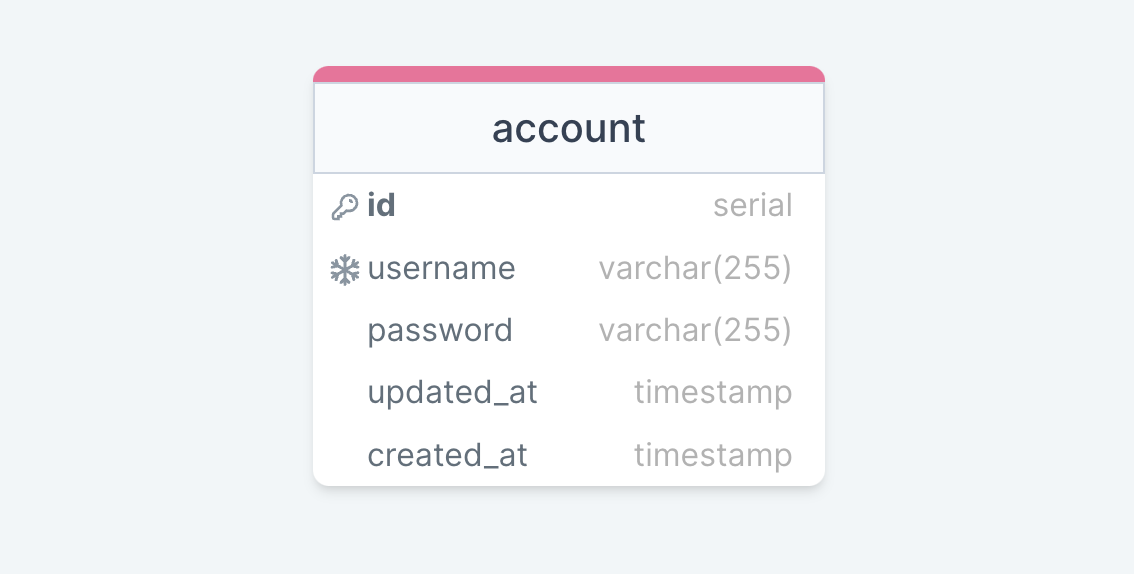
Let's begin by creating a model for accounts. To keep things straightforward, this table will only include an id, username, password, and a couple of date fields to track the time of changes. The model might look like this:
Add a model
To add this model open file models.edn and add following:
{:account [[:id :serial {:primary-key true}]
           [:username [:varchar 255] {:null false
                                      :unique true}]
           [:password [:varchar 255] {:null false}]
           [:updated-at :timestamp {:default [:now]}]
           [:created-at :timestamp {:default [:now]}]]}
The models file should contain a map where the keys are the model names, which will correspond to table names in the database. The value for each key can either be a map with keys :fields, :indexes, :types, or simply a vector if there are only fields. In this scenario, we can opt for the simplified version and define a vector of fields directly without using a map.
A field definition is a vector consisting of three elements: the field name (which will be the column name in the database), the field type (which has a direct mapping to database column types, with PostgreSQL being used in this guide), and an optional map with different field options.
Accordingly, we added id and designated it as the primary key. We determined that username should be a variable character field with a length of 255, set to be unique and not null. The date fields are timestamps, automatically set to the current date by default at the moment a record is created in the database.
Make a migration
After introducing a new model we can generate our first migration:
$ clojure -X:migrations make
Created migration: migrations/0001_auto_create_table_account.edn
Actions:
  - create table account
This migration is generated automatically. The name of the migration file reflects the first action in the migration, in this case, the creation of the account table.
List existing migrations
Now, we can check the list of migrations and observe that our migration hasn't been applied yet. This is indicated by an empty "box" next to the migration name:
$ clojure -X:migrations list
Existing migrations:
[ ] 0001_auto_create_table_account.edn
We also have the option to review the SQL for the migration by executing explain command and providing a :number argument with the migration number:
$ clojure -X:migrations explain :number 1
SQL for forward migration 0001_auto_create_table_account.edn:

BEGIN;

CREATE TABLE account (
  id SERIAL CONSTRAINT account_pkey PRIMARY KEY,
  username VARCHAR(255) CONSTRAINT account_username_key UNIQUE NOT NULL,
  password VARCHAR(255) NOT NULL,
  updated_at TIMESTAMP DEFAULT NOW(),
  created_at TIMESTAMP DEFAULT NOW()
);

COMMIT;
Apply migration to the database
We are now prepared to execute our first migration and apply the changes to the database:
$ clojure -X:migrations migrate
Applying 0001_auto_create_table_account...
0001_auto_create_table_account successfully applied.
Let's verify the list of migrations again. An x inside the "box" indicates that the migration has been successfully applied:
$ clojure -X:migrations list
Existing migrations:
[x] 0001_auto_create_table_account.edn
Verify changes in the database
Now, let's examine the actual changes made to the database. We should find two tables: account and automigrate_migrations. The latter is a technical table used to track the status of applied migrations. Automigrate creates this table automatically, and its name can be customized through the tool's configuration.
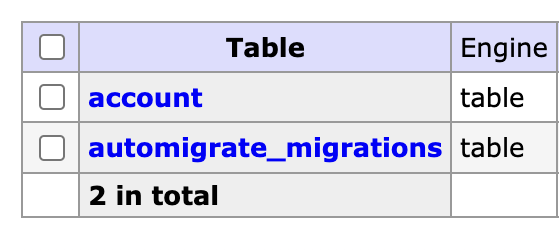
We can observe that, at this point, only one migration has been applied:

Finally, we can inspect the account table in the database to confirm the changes:
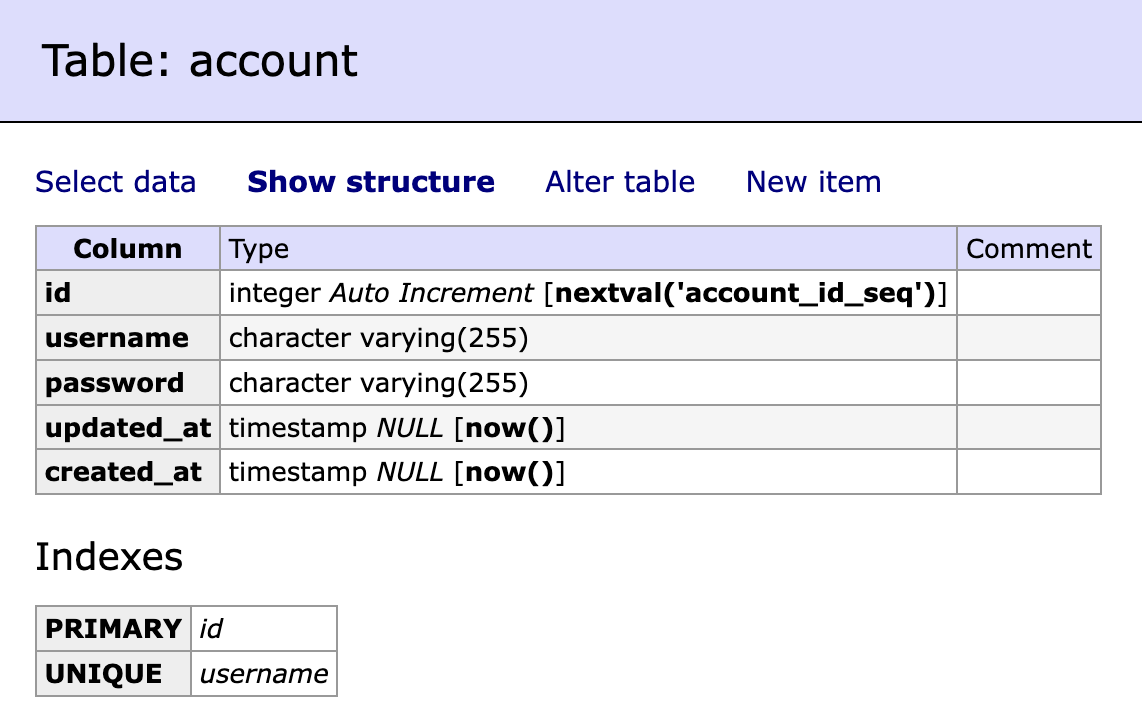
This step demonstrates the ease with which Automigrate allows for the application of database schema changes, facilitating a smooth development process for our simple application.
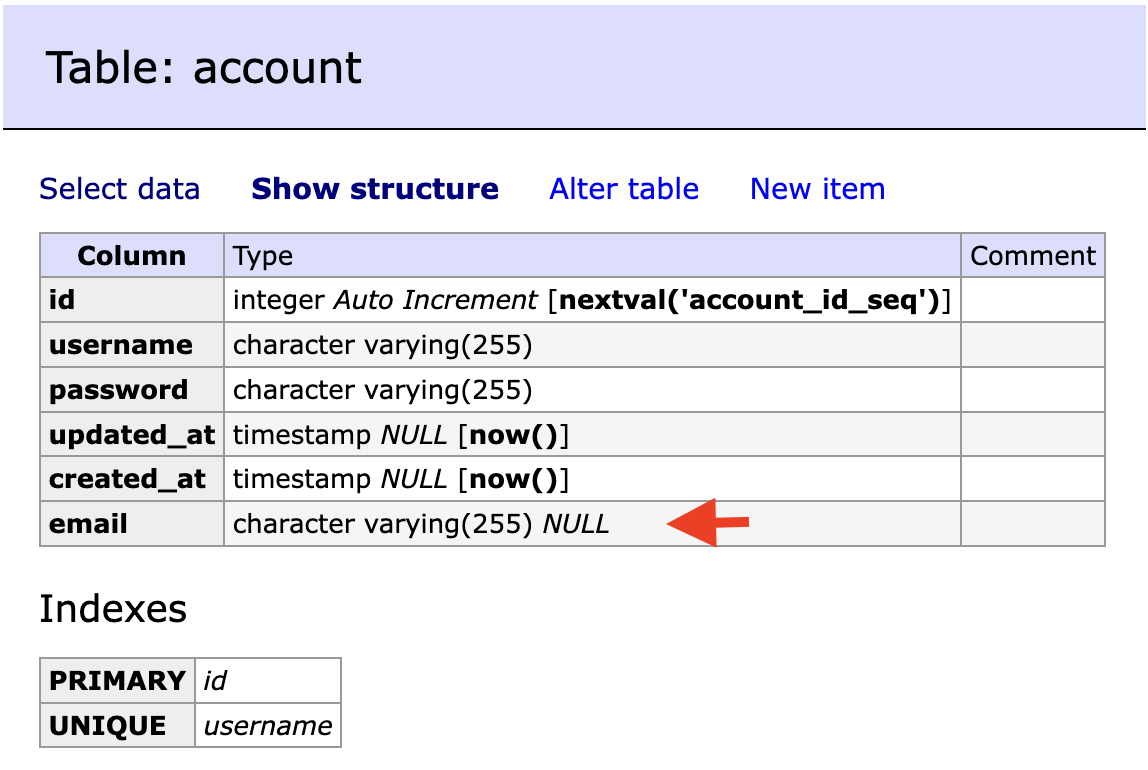
Add a column
At some point, we realized it would be beneficial to include an email address for each account. To do this, we simply add the new field to the model:
 {:account [[:id :serial {:primary-key true}]
            [:username [:varchar 255] {:null false
                                       :unique true}]
            [:password [:varchar 255] {:null false}]
+           [:email [:varchar 255]]
            [:updated-at :timestamp {:default [:now]}]
            [:created-at :timestamp {:default [:now]}]]}
Next, we execute make and migrate commands:
$ clojure -X:migrations make
Created migration: migrations/0002_auto_add_column_email_to_account.edn
Actions:
  - add column email to account
$ clojure -X:migrations migrate
Applying 0002_auto_add_column_email_to_account...
0002_auto_add_column_email_to_account successfully applied.
Just like that, the new column email is added to the database:
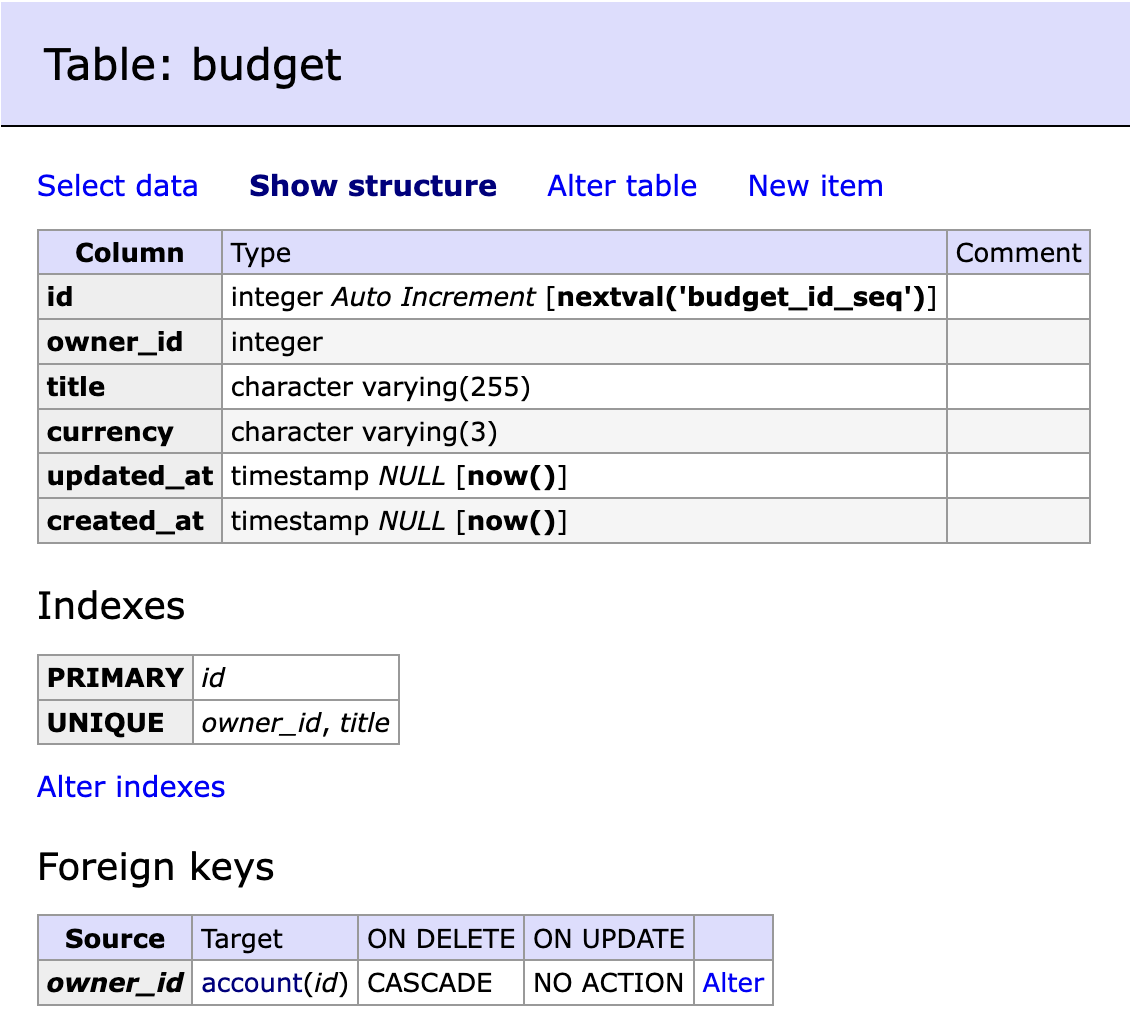
Foreign Key and Index
To store different budgets and settings for them, we can create a budget table. Budget contains title and currency and also a reference to the account. The structure can be visualized as follows:
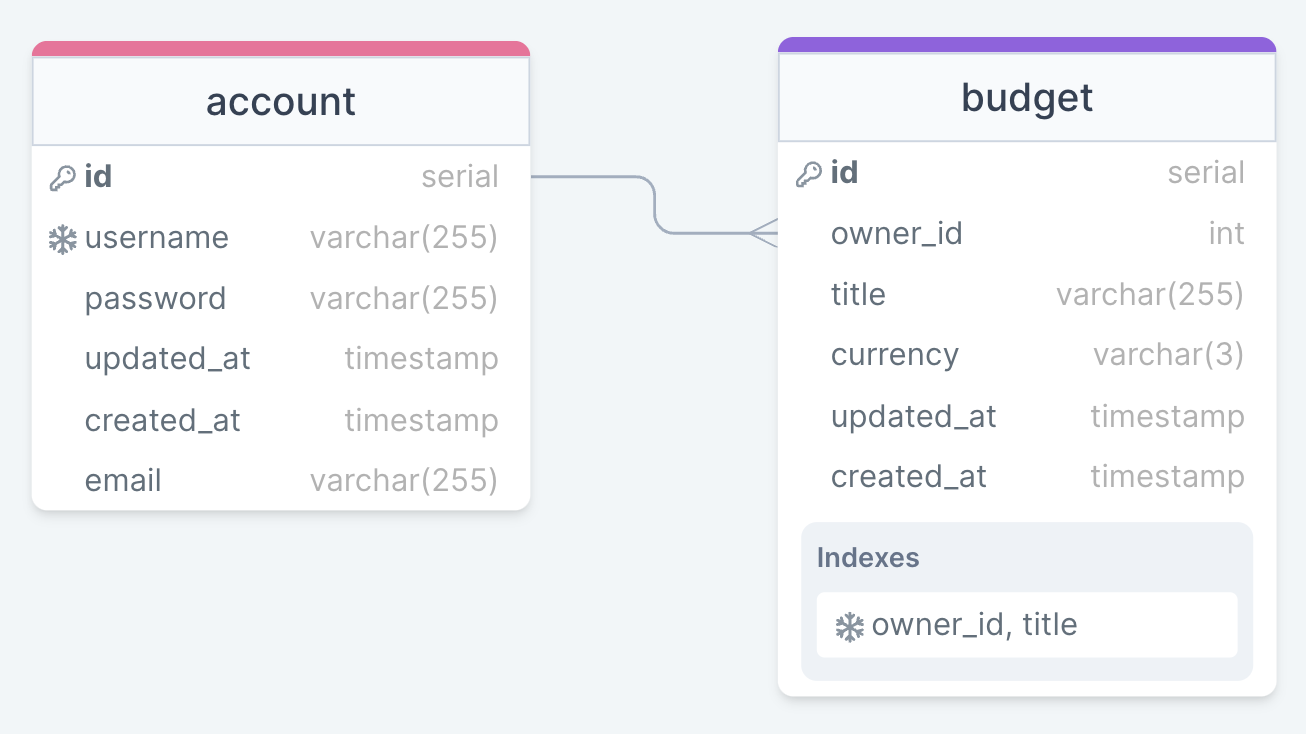
Given that a user can have multiple budgets, a Foreign Key on the account table by id is necessary. Additionally, to ensure uniqueness within a user's set of budgets - since different users might assign identical names to their budgets but within a single user's scope each budget name must be unique - we will implement a unique index on the account and title.
The modifications to the models are as follows:
{...
 :budget {:fields [[:id :serial {:primary-key true}]
                   [:owner-id :integer {:foreign-key :account/id
                                        :on-delete :cascade
                                        :null false}]
                   [:title [:varchar 255] {:null false}]
                   [:currency [:varchar 3] {:null false}]
                   [:updated-at :timestamp {:default [:now]}]
                   [:created-at :timestamp {:default [:now]}]]
          :indexes [[:budget-owner-title-unique-idx
                     :btree
                     {:fields [:owner-id :title]
                      :unique true}]]}}
The structure of index definition is similar to a field, but options in the third argument are mandatory and contain index-specific things: set of fields :fields for index and uniqueness flag :unique. There is also possible to make a partial index by using :where option with HoneySQL syntax in it.
To generate and apply the migration to the database, we execute:
$ clojure -X:migrations make
Created migration: migrations/0003_auto_create_table_budget_etc.edn
Actions:
  - create table budget
  - create index budget_owner_title_unique_idx on budget
$ clojure -X:migrations migrate
Applying 0003_auto_create_table_budget_etc...
0003_auto_create_table_budget_etc successfully applied.
The budget table is now established in the database, complete with the specified index and Foreign Key as outlined:
Check, Enum, Comment
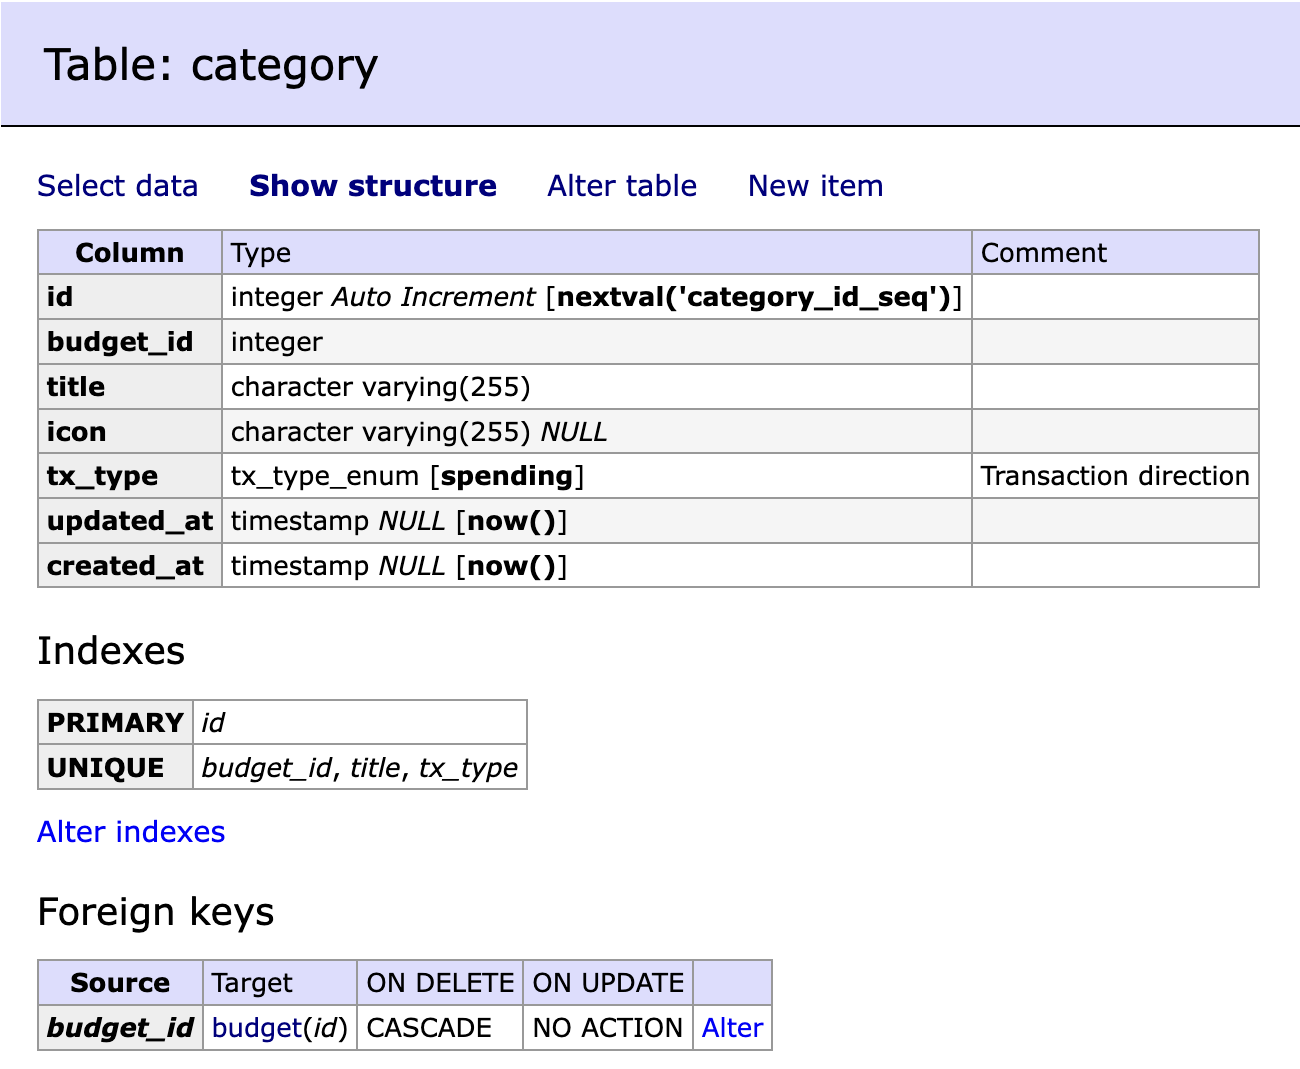
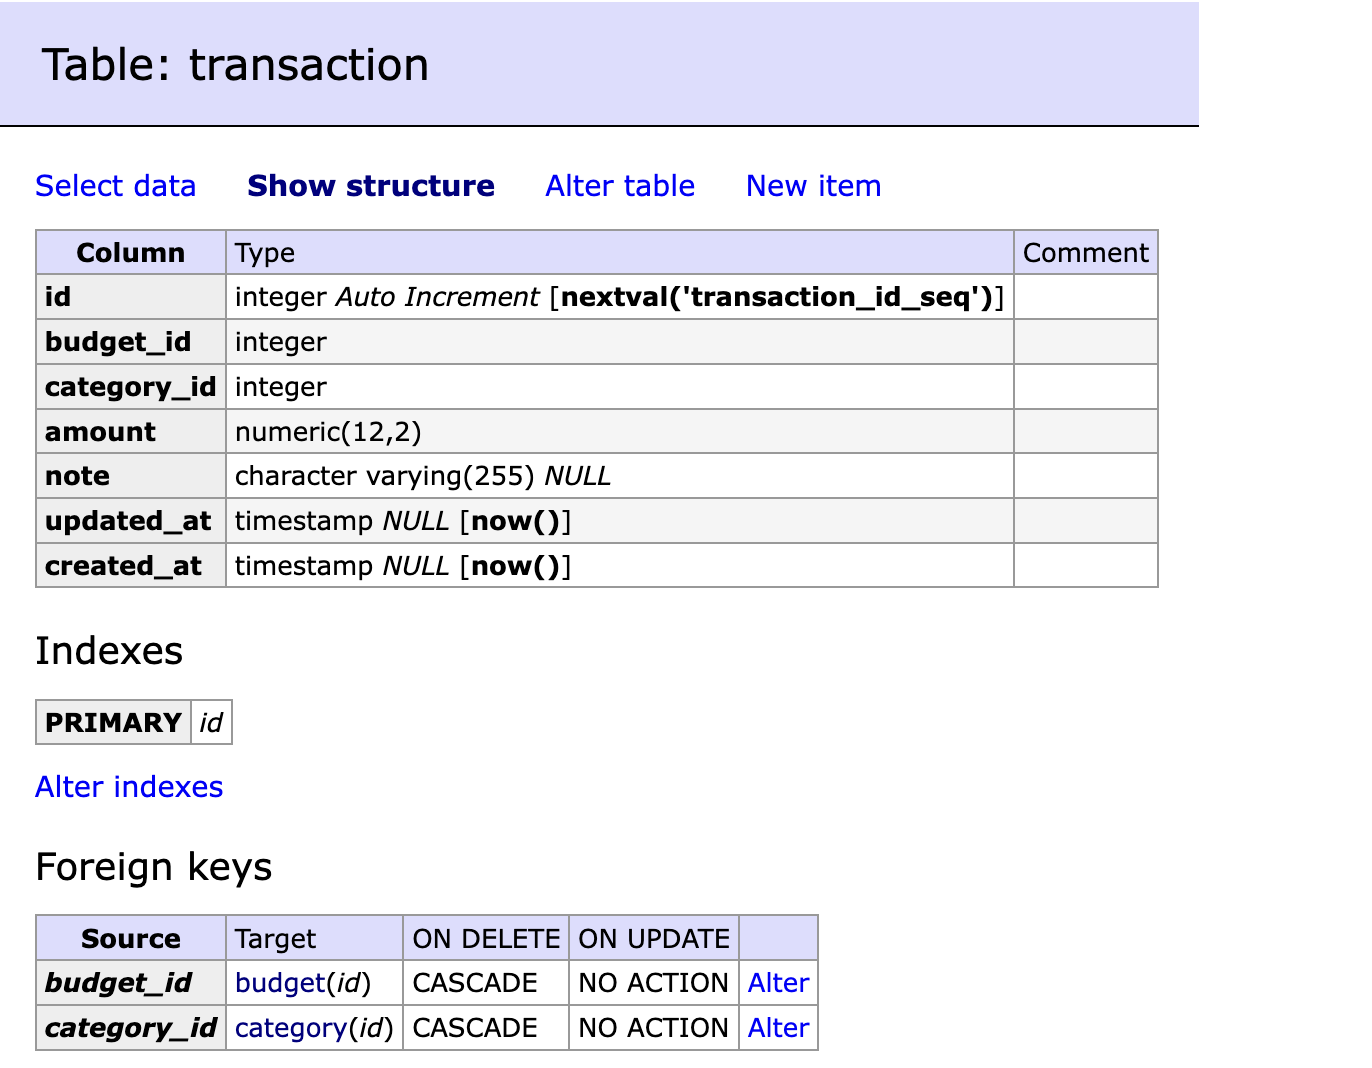
In our final step, we aim to add tables for categories and transactions. To ensure distinct categories for different budgets, the category table will include a Foreign Key referencing budget. Similarly, transactions will reference a specific budget to track expenses accurately. Categories will be distinguished between spending and income types, leading to the following comprehensive database schema:
To implement this schema we introduce following changes to our models.edn:
{...
 :category {:fields [[:id :serial {:primary-key true}]
                     [:budget-id :integer {:foreign-key :budget/id
                                           :on-delete :cascade
                                           :null false}]
                     [:title [:varchar 255] {:null false}]
                     [:icon [:varchar 255]]
                     [:tx-type
                      [:enum :tx-type-enum]
                      {:default "spending"
                       :null false
                       :comment "Transaction direction"}]
                     [:updated-at :timestamp {:default [:now]}]
                     [:created-at :timestamp {:default [:now]}]]
            :types [[:tx-type-enum :enum {:choices ["spending" "income"]}]]
            :indexes [[:category-account-title-tx-type-unique-idx
                       :btree
                       {:fields [:budget-id :title :tx-type]
                        :unique true}]]}

 :transaction [[:id :serial {:primary-key true}]
               [:budget-id :integer {:foreign-key :budget/id
                                     :on-delete :cascade
                                     :null false}]
               [:category-id :integer {:foreign-key :category/id
                                       :on-delete :cascade
                                       :null false}]
               [:amount [:numeric 12 2] {:null false
                                         :check [:<> :amount 0]}]
               [:note [:varchar 255]]
               [:updated-at :timestamp {:default [:now]}]
               [:created-at :timestamp {:default [:now]}]]}
For transactions, the amount field uses the numeric type (in Postgresql the same as "decimal") for precise storage. The amount can be either positive or negative, but cannot be zero. This validation is enforced using a Check Constraint [:<> :amount 0] with HoneySQL syntax.
For category, we should define transaction type, and we used custom Enum type with possible values: spending, income. The structure of custom type definition is also similar to a field definition, but options are required. So we need to add Enum type definition in :types key of the model. Then we can use it as a value for :tx-type field definition.
In the category model, we define the transaction type using a custom Enum type with possible values: spending, income. The structure for defining custom types is akin to field definitions but requires specifying options. Therefore, we need to add the Enum type definition under the :types key of the model before using it in the :tx-type field definition.
To clarify the meaning of the :tx-type field of category model we added a comment to the field. This comment will be displayed in the database as well.
Let's proceed with the migration and apply it:
$ clojure -X:migrations make
Created migration: migrations/0004_auto_create_type_tx_type_enum_etc.edn
Actions:
  - create type tx_type_enum
  - create table category
  - create table transaction
  - create index category_account_title_tx_type_unique_idx on category
$ clojure -X:migrations migrate
Applying 0004_auto_create_type_tx_type_enum_etc...
0004_auto_create_type_tx_type_enum_etc successfully applied.
Now, we can check the status of all existing migrations and confirm that all have been applied:
$ clojure -X:migrations list
Existing migrations:
[x] 0001_auto_create_table_account.edn
[x] 0002_auto_add_column_email_to_account.edn
[x] 0003_auto_create_table_budget_etc.edn
[x] 0004_auto_create_type_tx_type_enum_etc.edn
We can then verify that the database has been updated according to the changes made to the models, showcasing the versatility and power of Automigrate in handling complex database schema designs:
Overview
Throughout this guide, we've explored how to model and modify a database schema within a Clojure application using Automigrate. This library allows developers to concentrate on the domain-specific aspects of their applications without the need to divert attention to SQL. While Automigrate is continually being developed and enhanced, it already offers capabilities for managing tables, indexes, column-level constraints, and enum types, including comprehensive support for backward migrations. One of the primary advantages of Automigrate is the visibility it provides into the database schema through models.
This brief introduction aimed to highlight the main benefits of Automigrate and demonstrate its basic utility. Thank you for your attention, and I hope you found this guide informative!