Deploying a full-stack Clojure app with Kamal on a single server
May 29, 2024DISCLAIMER
This article covers deployment setup for Kamal version 1.x. For a setup with Kamal version 2.x, please refer to the Clojure Stack Lite documentation.
While the deployment configuration has changed, the article remains relevant for Clojure/ClojureScript project organization and setup.
TL;DR
To get a quick example of a Clojure app setup with full deployment configuration, including API service, frontend with ClojureScript, and PostgreSQL, check out the clojure-kamal-example project repository. To try the deployment yourself, simply clone the repo and follow the Deploy: summary section. If you already have a Docker image that exposes port 80, you can skip the project setup overview part of this article and go straight to the "Deployment config" section.
Overview
Sometimes I need to quickly deploy an app without worrying too much about scalability. In this case, it's fine to deploy an app on a single server. This approach works for small/medium non-critical apps, staging, or preview environments. In this article, I'm going to show how we can configure Kamal to deploy a full-stack Clojure/Script app on a single server with a Let's Encrypt TLS certificate. The good part is that when the time comes, you can add a load balancer in front of the app and scale to multiple servers.
I'm going to start by highlighting the important parts of the application setup. Then we will overview the deployment config, perform server setup, and conduct the first deployment. We will also briefly check how we can manage our app on the server. Finally, we will configure a full CI process to automatically deploy our app to the server from GitHub Actions.
Project setup overview
We are going to set up a web app with a Clojure API server on the backend, ClojureScript with Re-frame on the frontend, and PostgreSQL as the main database. You can check the example project in the repository clojure-kamal-example. Important bits of the project's structure look like this:
clojure-kamal-example
├── README.md
├── .tool-versions
├── Dockerfile
├── Taskfile.yaml
├── deps.edn
├── build.clj
├── package.json
├── shadow-cljs.edn
├── tailwind.config.js
├── .github
│   ├── actions/
│   └── workflows
│       ├── checks.yaml
│       └── deploy.yaml
├── config
│   └── deploy.yml
├── dev
│   └── user.clj
├── resources
│   └── db
│   │   ├── migrations/
│   │   └── models.edn
│   ├── public
│   │   ├── css
│   │   │   └── input.css
│   │   └── index.html
│   ├── config.edn
│   └── logback.xml
├── src
│   ├── clj
│   │   └── api
│   │       ├── util/
│   │       ├── db.clj
│   │       ├── handler.clj
│   │       ├── server.clj
│   │       └── main.clj
│   ├── cljc
│   │   └── common
│   │       └── api_routes.cljc
│   └── cljs
│       └── ui
│           ├── util/
│           ├── db.cljs
│           ├── events.cljs
│           ├── router.cljs
│           ├── subs.cljs
│           ├── views.cljs
│           └── main.cljs
└── test/
Here we use general names api, ui, and common for the namespace prefix of each application part. I quite like this approach because it unifies those parts and makes it easier to switch between different projects.
Speaking about libraries and tools, we are using: Integrant for app system management, Reitit for routing on the backend and frontend, Malli for data validation, and Automigrate for managing database migrations. On the frontend, we are using ClojureScript with Re-frame, Shadow CLJS as a build system, and Tailwind CSS for styling. For managing the app locally and in CI, we use Taskfile as a replacement for Make and mise-en-place for system tools version management.
For demonstration purposes, I added a couple of database models: movie and director, an API route to get all records from the movie model, and the representation of that list on the web page. API routes are defined in the common cljc-directory to use API routes on the frontend by names from a single source of truth.
Backend
The app system looks like:
resources/config.edn
{:api.db/db {:options
             {:jdbc-url #profile {:default #env DATABASE_URL
                                  :test "jdbc:tc:postgresql:15.2-alpine3.17:///testdb?TC_DAEMON=true"}}}

 :api.handler/handler {:options
                       {:reloaded? #profile {:default false
                                             :dev true}
                        :cache-assets? #profile {:default false
                                                 :prod true}}
                       :db #ig/ref :api.db/db}

 :api.server/server {:options
                     {:port #profile {:default 8000
                                      :prod 80
                                      :test #free-port true}}
                     :handler #ig/ref :api.handler/handler}}
The system contains three components:
:api.db/db- database connection pool;:api.handler/handler- application handler with an API Reitit-router based on Ring and middlewares;:api.server/server- Jetty server.
I like the approach of grouping component config options into the :options key to avoid mixing them with references to other components. We use Malli to validate all config parameters for each component of the system.
Here we use Aero to extend the system config with useful data readers. There is a #profile reader to switch between dev, test, and prod; #env for reading environment variables. It is extended with Integrant's #ig/ref to use components as references in other components.Also, I added #free-port to pick a free port for the API web server while it's starting in tests.
In handler, there are options to enable auto-reloading backend code on any change without restarting the whole system by using :reloaded?, and :cache-assets? options to enable static asset caching in production. You can read about the approach for auto-reloading in the related article.
During tests, we automatically start the database as a Docker container using Testcontainers' feature JDBC support. All we need is to add the tc: prefix after jdbc: in the JDBC URL, and Testcontainers will manage the database container under the hood. To speed up tests, we use the TC_DAEMON=true parameter in the JDBC URL to reuse the same container for multiple tests. This container will be stopped automatically with the JVM shutdown.
Frontend
On the frontend we use reitit.frontend.easy/start! to configure a router.
To render the main page we use re-frame.core/create-root to be able to use recent React
versions (=> 18.x).
To build css for development and in production we use Tailwind CSS js library directly via npx.
We run Shadow CLJS via clojure cli and build configuration uses :deps as a source of all dependencies. We also enabled hashing of JavaScript files in the release build. To use those hashed JavaScript files in index.html, we use the existing function shadow.html/copy-file. For CSS, there is no built-in solution, so I added a custom function build/hash-css that adds a hash to the Tailwind CSS CLI output and updates the CSS file in index.html.
Build docker image
The Dockerfile is based on Alpine and has two simple stages:
- Build stage: builds the uberjar with all minified and hashed frontend static files.
- Result stage: final image with only the uberjar from the previous stage.
FROM --platform=linux/amd64 clojure:temurin-21-tools-deps-1.11.3.1456-alpine AS build

WORKDIR /app

# Install npm
RUN echo "http://dl-cdn.alpinelinux.org/alpine/v3.20/community" >> /etc/apk/repositories
RUN apk add --update --no-cache npm=10.8.0-r0

# Node deps
COPY package.json package-lock.json /app/
RUN npm i

# Clojure deps
COPY deps.edn  /app/
RUN clojure -P -X:cljs:shadow

# Build ui and uberjar
COPY . /app
RUN npx tailwindcss -i ./resources/public/css/input.css -o ./resources/public/css/output-prod.css --minify \
    && clojure -M:dev:cljs:shadow release app \
    && clojure -T:build build


FROM --platform=linux/amd64 eclipse-temurin:21.0.2_13-jre-alpine
LABEL org.opencontainers.image.source=https://github.com/abogoyavlensky/clojure-kamal-example

WORKDIR /app
COPY --from=build /app/target/standalone.jar /app/standalone.jar
RUN apk add --no-cache curl

EXPOSE 80
CMD ["java", "-Xmx256m", "-jar", "standalone.jar"]
We are going to deploy on the amd64 architecture, so to be able to deploy the first time from macOS with Apple Silicon, we added --platform=linux/amd64 to the FROM definition.
At the build step, we run CSS, JS, and uberjar builds separately, one by one. We are going to publish images to the GitHub ghcr.io registry, so it's convenient to link uploaded images with the repository by default. For this purpose, we added a LABEL to the final image definition. We also added the -Xmx256m option to the Java command, as it allows us to deploy to a small instance. You can extend and update this configuration as you prefer.
Deployment config
Kamal is just a thin wrapper around Docker, so nearly everything can be customized and reconfigured. It has predefined scripts to bootstrap servers with the installation of cURL and Docker. It also has a default config for Traefik, which it uses as the reverse proxy to route all traffic to the app. Additionally, it has a handy CLI tool to manage the service on the host: build, deploy, read logs, execute commands, etc.
Let's look at the full deployment config for Kamal that includes Traefik, the web app, and database configuration.
config/deploy.yaml
service: clojure-kamal-example
image: <%= ENV['REGISTRY_USERNAME'] %>/clojure-kamal-example

servers:
  web:
    hosts:
      - <%= ENV['SERVER_IP'] %>
    labels:
      traefik.http.routers.clojure-kamal-example.rule: Host(`<%= ENV['APP_DOMAIN'] %>`)
      traefik.http.routers.clojure-kamal-example.tls: true
      traefik.http.routers.clojure-kamal-example.entrypoints: websecure
      traefik.http.routers.clojure-kamal-example.tls.certresolver: letsencrypt
    options:
      network: "traefik"

registry:
  server: ghcr.io
  username:
    - REGISTRY_USERNAME
  password:
    - REGISTRY_PASSWORD

builder:
  multiarch: false
  cache:
    type: gha
    options: mode=max

healthcheck:
  path: /health
  port: 80
  max_attempts: 15
  interval: 30s

env:
  secret:
    - DATABASE_URL

# Database
accessories:
 db:
   image: postgres:15.2-alpine3.17
   host: <%= ENV['SERVER_IP'] %>
   env:
     secret:
       - POSTGRES_DB
       - POSTGRES_USER
       - POSTGRES_PASSWORD
   directories:
     - clojure_kamal_example_postgres_data:/var/lib/postgresql/data
   options:
     network: "traefik"

# Traefik
traefik:
  options:
    publish:
      - "443:443"
    network: "traefik"
    volume:
      - "/root/letsencrypt:/letsencrypt"
  args:
    entrypoints.web.address: ":80"
    entrypoints.websecure.address: ":443"
    # TLS-certificate configuration
    certificatesResolvers.letsencrypt.acme.email: <%= ENV['TRAEFIK_ACME_EMAIL'] %>
    certificatesResolvers.letsencrypt.acme.storage: "/letsencrypt/acme.json"
    certificatesResolvers.letsencrypt.acme.tlschallenge: true
    certificatesResolvers.letsencrypt.acme.httpchallenge.entrypoint: web
    # Redirect to HTTPS by default
    entryPoints.web.http.redirections.entryPoint.to: websecure
    entryPoints.web.http.redirections.entryPoint.scheme: https
    entryPoints.web.http.redirections.entrypoint.permanent: true
We configured Traefik with additional arguments prefixed with certificatesResolvers and a volume to automatically add TLS certificates using Let's Encrypt. Additionally, we included a couple of entryPoints arguments to automatically redirect from http to https.
We added web service configuration with Traefik labels to set up the domain for the app:
servers:
  web:
    hosts:
      - <%= ENV['SERVER_IP'] %>
    labels:
      traefik.http.routers.clojure-kamal-example.rule: Host(`<%= ENV['APP_DOMAIN'] %>`)
      traefik.http.routers.clojure-kamal-example.tls: true
      traefik.http.routers.clojure-kamal-example.entrypoints: websecure
      traefik.http.routers.clojure-kamal-example.tls.certresolver: letsencrypt
    options:
      network: "traefik"
We are going to read the server IP from the environment variable, so we use Ruby template syntax for it: <%= ENV['SERVER_IP'] %>. If you want to deploy to multiple servers, you can read multiple IPs from a single environment variable containing a comma-separated string of IPs, and then read it in the config like this: hosts: <%= ENV['SERVER_IPS'].split(',') %>.
Our app contains just an initial setup with a database connection, so at the moment, we need to configure just the JDBC URL environment variable:
env:
  secret:
    - DATABASE_URL
We run the database as an accessory on the same host, with configurations for secrets and directories to store data, so for all services, we use the same Docker network, which in our case is called traefik. The network name can be anything you want. A custom Docker network is needed to allow the app to access the database running on the same host. So, if you run the database on a different host or use a third-party service like Supabase or Neon, you don't need to set up a Docker network.
We are going to use the GitHub registry as a Docker registry for pushing Docker images of our app. However, it is possible to use any registry you want; just change the registry.server value.
We will use Kamal to build the Docker image of the app and GitHub Actions as our CI service, which includes a configuration for caching to speed up builds. We are going to deploy on the amd64 architecture, so to avoid wasting time building multiple images for each platform, the simplest solution is to disable multiarch build:
builder:
  multiarch: false
  cache:
    type: gha
    options: mode=max
Finally, we adjusted the health check configuration with custom path, port, and attempt settings:
healthcheck:
  path: /health
  port: 80
  exposed_port: 4001
  max_attempts: 15
  interval: 30s
Initial deployment
First of all, we need to bootstrap the server with the initial installation and deployment of the app and other services.
Prerequisites
- Docker installed on the local machine.
- Server with a public IP.
- Domain pointed to the server.
- SSH connection from the local machine to the server using SSH keys.
- Open ports 443 and 80 on the server.
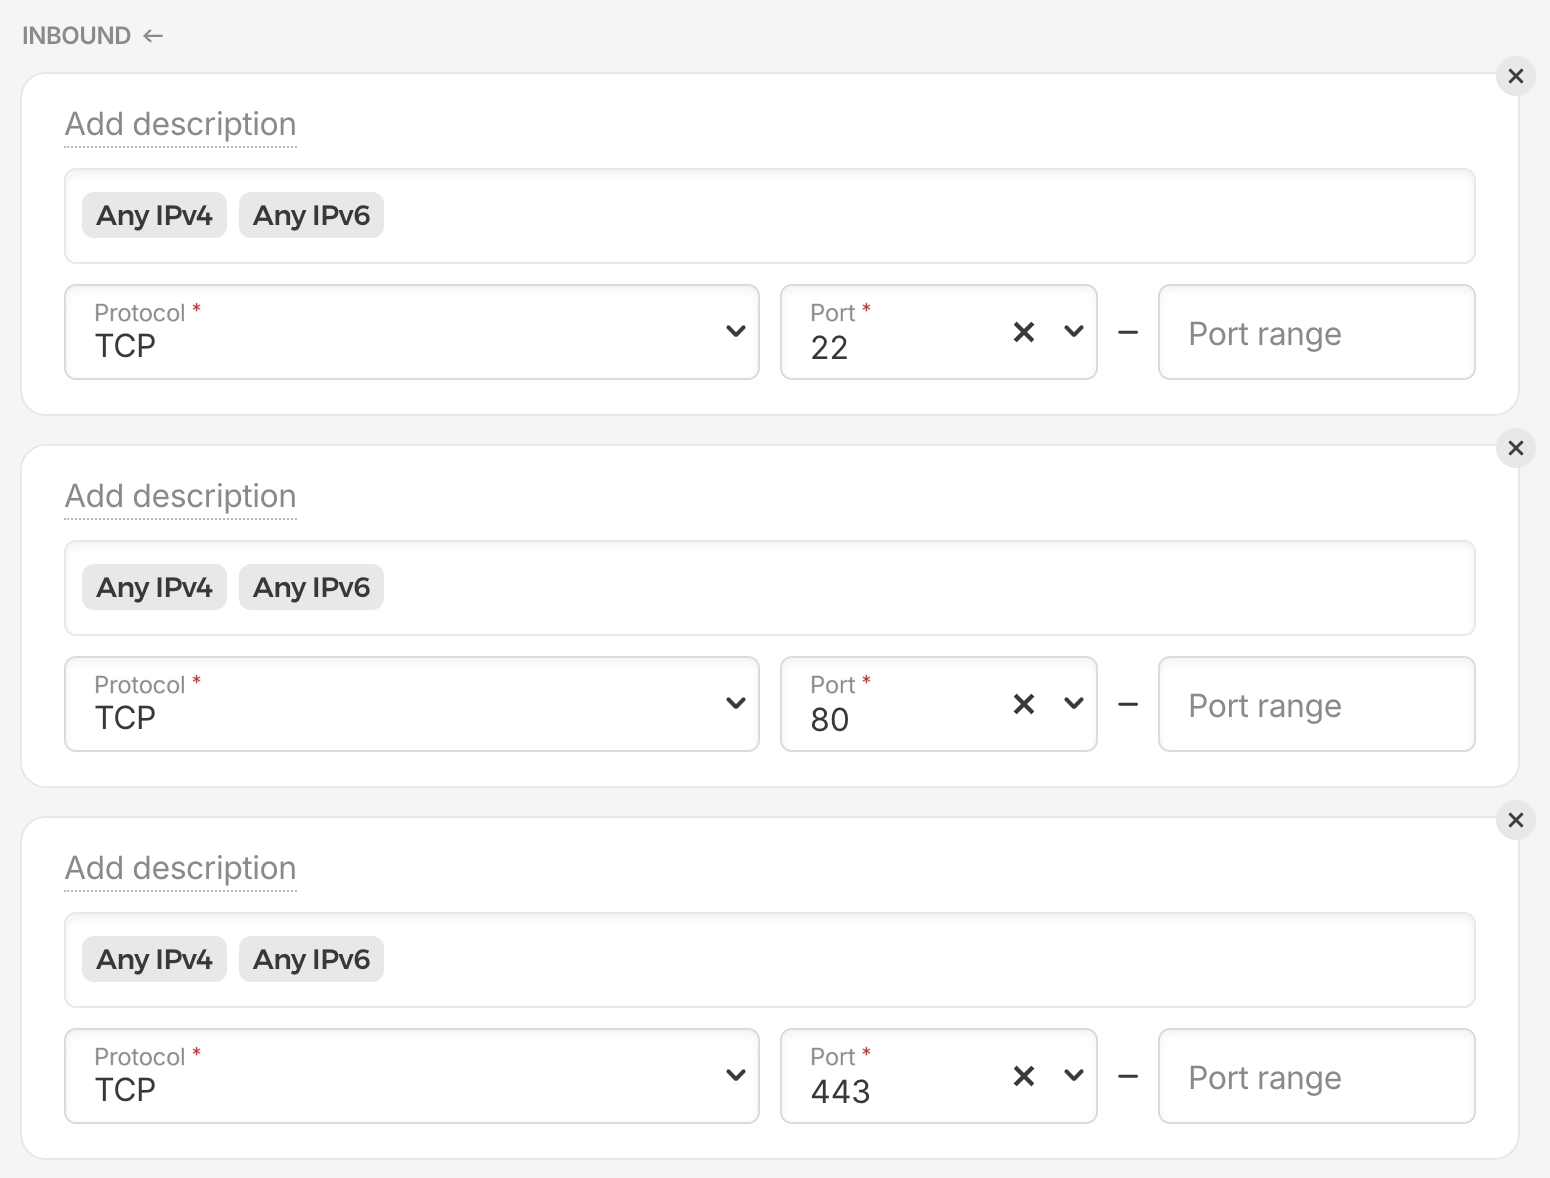
- (Optional) Configure the firewall to open only ports 443, 80, and 22.
An example of the firewall configuration for the server might look like:
Install Kamal locally
Install mise-en-place (or asdf), and run:
brew install libyaml  # or on Ubuntu: `sudo apt-get install libyaml-dev`
mise install ruby
gem install kamal -v 1.5.2
kamal version
Note: Alternatively, you can use the dockerized version of Kamal by running the ./kamal.sh predefined command instead of the Ruby gem version. It mostly works for the initial server setup, but some management commands don't work properly. For instance, ./kamal.sh app logs -f or ./kamal.sh build push.
Env variables
Run command envify to create a .env with all required empty variables:
kamal envify --skip-push
The --skip-push parameter prevents the .env file from being pushed to the server.
Now, we should fill all environment variables in the .env file with actual values for deployment on the server.
Here’s an example:
# Generated by kamal envify
# DEPLOY
SERVER_IP=192.168.0.1
REGISTRY_USERNAME=your-username
REGISTRY_PASSWORD=secret-registry-password
TRAEFIK_ACME_EMAIL=your_email@example.com
APP_DOMAIN=app.domain.com

# App
DATABASE_URL="jdbc:postgresql://clojure-kamal-example-db:5432/demo?user=demoadmin&password=secret-db-password"

# DB accessory
POSTGRES_DB=demo
POSTGRES_USER=demoadmin
POSTGRES_PASSWORD=secret-db-password
Notes:
SERVER_IP- The IP of the server you want to deploy your app to. You should be able to connect to it using SSH keys.REGISTRY_USERNAMEandREGISTRY_PASSWORD- Credentials for the Docker registry. In our case, we are usingghcr.io, but it can be any registry.TRAEFIK_ACME_EMAIL- Email for registering a TLS certificate with Let's Encrypt and Traefik.APP_DOMAIN- The domain of your app, which should be configured to point toSERVER_IP.clojure-kamal-example-db- The name of the database container from the accessories section of thedeploy/config.ymlfile.- We duplicated database credentials to set up the database container and use
DATABASE_URLin the app.
Note: Do not include file .env to git repository!
Bootstrap server and deploy app
Install Docker on a server:
kamal server bootstrap
Create a Docker network for access to the database container from the app by container name and a directory for Let’s Encrypt certificates:
ssh user@192.168.0.1 'docker network create traefik'
ssh user@192.168.0.1 'mkdir -p /root/letsencrypt && touch /root/letsencrypt/acme.json && chmod 600 /root/letsencrypt/acme.json'
Set up Traefik, the database, environment variables, build/push app image and run app on a server:
kamal setup
The app is deployed on the server, but it is not fully functional yet. We need to apply database migrations:
kamal app exec 'java -jar standalone.jar migrations'
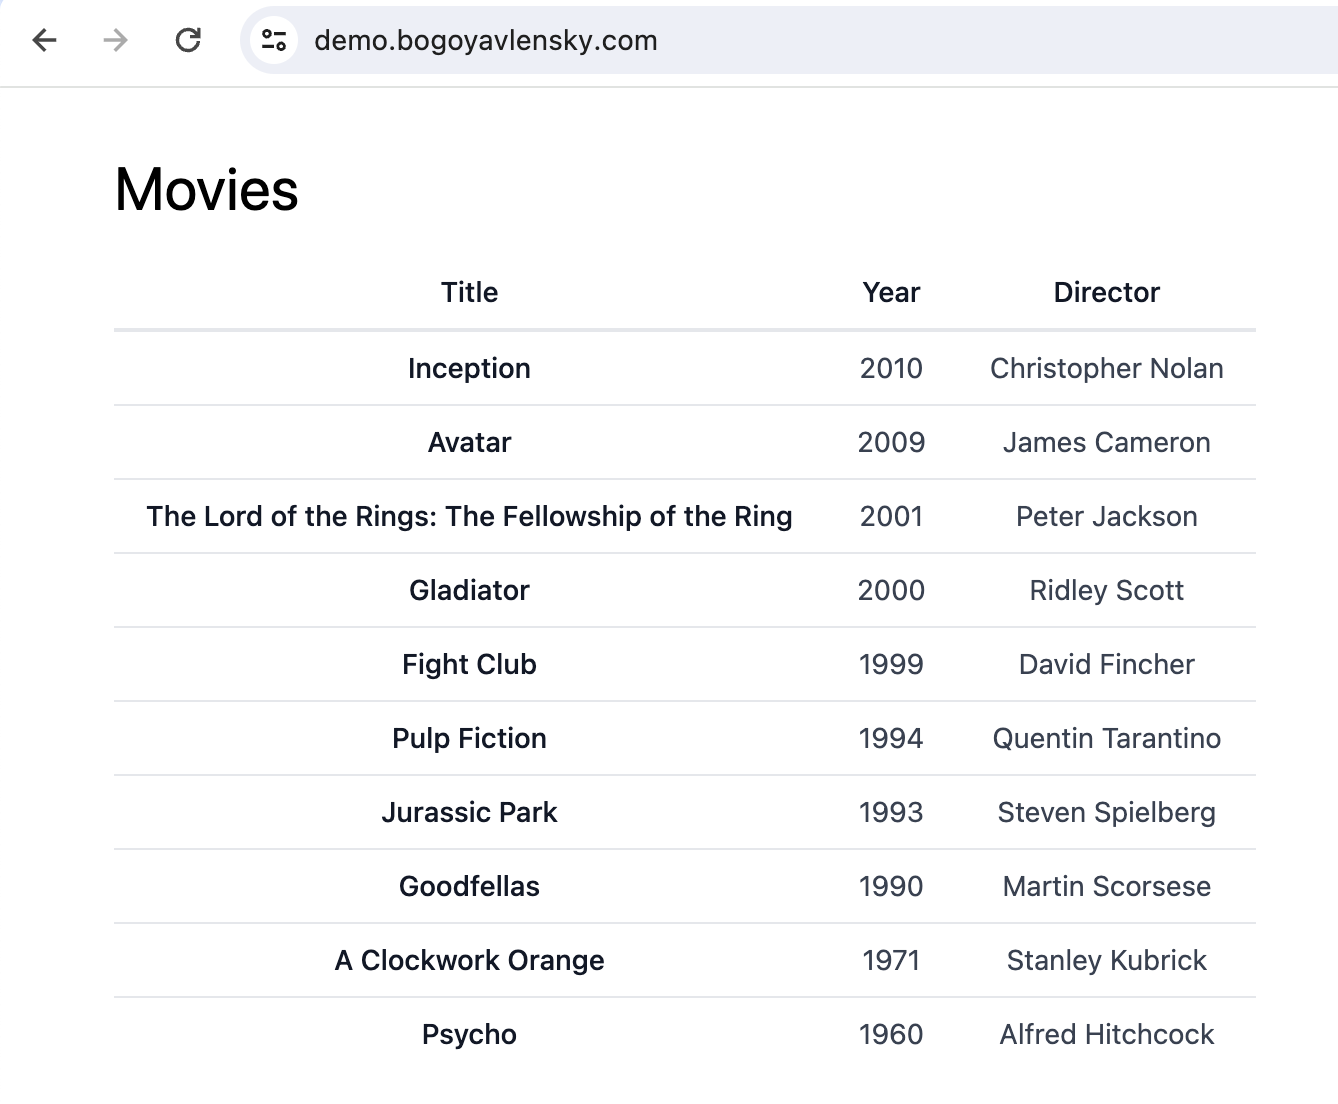
Now, the application is fully deployed on the server! You can check it on your domain, the home page should look similar to:
A note about database migrations in production
In general, I don't like to run database migrations as part of the database component in the app system, because we don't have full control over the migration process. Instead, I prefer to run migrations as a separate step in the CI pipeline before deployment.
To be able to run migrations within the jar file, I added a second command to the main function of the app. Automigrate by default reads the environment variable DATABASE_URL and uses models and migrations from the directory resources/db. So by default, we don't need to configure anything other than setting up the database URL environment variable. The main function of the app looks like this:
api.main.clj
(ns api.main
  (:gen-class)
  (:require [clojure.tools.logging :as log]
            [integrant.core :as ig]
            [automigrate.core :as automigrate]
            [api.util.system :as system-util]))


(defn- run-system
  [profile]
  (let [profile-name-kw profile
        config (system-util/config profile-name-kw)]
    (log/info "[SYSTEM] System is starting with profile:" profile-name-kw)
    (ig/load-namespaces config)
    (-> config
        (ig/init)
        (system-util/at-shutdown))
    (log/info "[SYSTEM] System has been started successfully.")))


(defn -main
  "Run application system in production env."
  [& args]
  (case (first args)
    "migrations" (automigrate/migrate)
    (run-system :prod)))
Running the jar without any arguments will start the app system on port 80:
java -jar standalone.jar. If we need to run migrations, we just add an argument to the command: java -jar standalone.jar migrations.
Regular deploy
For subsequent deployments from the local machine, run:
kamal deploy
Or just push to the master branch, there is a GitHub Actions pipeline that does
the deployment automatically .github/workflows/deploy.yaml.
We will check it in detail in following section.
Manage app on the server
Let's see a couple of useful commands to manage and inspect our application on the server.
Getting list of running containers:
kamal details -q

Traefik Host: 192.168.0.1
CONTAINER ID   IMAGE           COMMAND                  CREATED       STATUS       PORTS                                                                      NAMES
045e76b559e3   traefik:v2.10   "/entrypoint.sh --pr…"   3 weeks ago   Up 3 weeks   0.0.0.0:80->80/tcp, :::80->80/tcp, 0.0.0.0:443->443/tcp, :::443->443/tcp   traefik

App Host: 192.168.0.1
CONTAINER ID   IMAGE                                                                                   COMMAND                  CREATED          STATUS                    PORTS     NAMES
e1007ae82d0b   ghcr.io/abogoyavlensky/clojure-kamal-example:f0dce409b7cde87a22597a56f3f23e8a24374215   "/__cacert_entrypoin…"   12 minutes ago   Up 12 minutes (healthy)   80/tcp    clojure-kamal-example-web-f0dce409b7cde87a22597a56f3f23e8a24374215

Accessory db Host: 192.168.0.1
CONTAINER ID   IMAGE                      COMMAND                  CREATED       STATUS       PORTS                                       NAMES
da9d0b805330   postgres:15.2-alpine3.17   "docker-entrypoint.s…"   3 weeks ago   Up 3 weeks   5432/tcp   clojure-kamal-example-db
Follow application logs:
kamal app logs -f
...
Start an interactive shell session in the currently running container:
kamal app exec -i --reuse sh
Get current version of running container...
  ...
Launching interactive command with version f0dce409b7cde87a22597a56f3f23e8a24374215 via SSH from existing container on 192.168.0.1...
/app #
Print app version:
kamal app version

...
  INFO [9dcdfdb6] Finished in 1.311 seconds with exit status 0 (successful).
App Host: 192.168.0.1
f0dce409b7cde87a22597a56f3f23e8a24374215
Stop or start current version of application:
kamal app stop
kamal app start
If you want to change traefik config, run:
kamal traefik reboot
And few more commands you could find by running:
kamal help
CI
At this moment, we have the application running on the server and the ability to deploy and manage it from a local machine. The next step is to deploy the app from the CI pipeline.
CI pipeline: environment variables
For the CI setup, you need to add the following environment variables as secrets for Actions. In the GitHub UI of the repository, navigate to Settings -> Secrets and variables -> Actions. Then add variables with the same values you added to the local .env file:
APP_DOMAIN
DATABASE_URL
POSTGRES_DB
POSTGRES_PASSWORD
POSTGRES_USER
SERVER_IP
SSH_PRIVATE_KEY
TRAEFIK_ACME_EMAIL
SSH_PRIVATE_KEY- a new SSH private key without password that you created and added public part of it to the server's~/.ssh/authorized_keysto authorize from CI-worker.
To generate SSH keys, run:
ssh-keygen -t ed25519 -C "your_email@example.com"
CI pipeline: deploy
As I mentioned earlier, we are using GitHub Actions, so let's look at the deployment config:
.github/workflows/deploy.yaml
name: Deploy

on:
  push:
    branches: [ master ]

jobs:
  checks:
    uses: ./.github/workflows/checks.yaml

  deploy:
    runs-on: ubuntu-latest
    permissions:
      contents: read
      packages: write
    timeout-minutes: 20
    needs: [ checks ]
    steps:
      - uses: actions/checkout@v4
      - uses: jdx/mise-action@v2
      - uses: webfactory/ssh-agent@v0.9.0
        with:
          ssh-private-key: ${{ secrets.SSH_PRIVATE_KEY }}

      - name: Setup Docker Buildx
        uses: docker/setup-buildx-action@v3

      - name: Expose GitHub Runtime for cache
        uses: crazy-max/ghaction-github-runtime@v3

      - name: Install kamal
        run: gem install kamal -v 1.5.2

      - name: Push env vars
        env:
          SERVER_IP: ${{ secrets.SERVER_IP }}
          REGISTRY_USERNAME: ${{ github.repository_owner }}
          REGISTRY_PASSWORD: ${{ github.token }}
          TRAEFIK_ACME_EMAIL: ${{ secrets.TRAEFIK_ACME_EMAIL }}
          APP_DOMAIN: ${{ secrets.APP_DOMAIN }}
          DATABASE_URL: ${{ secrets.DATABASE_URL }}
          POSTGRES_DB: ${{ secrets.POSTGRES_DB }}
          POSTGRES_USER: ${{ secrets.POSTGRES_USER }}
          POSTGRES_PASSWORD: ${{ secrets.POSTGRES_PASSWORD }}
        run: kamal envify

      - name: Build and push
        run: |
          kamal registry login
          kamal build push --version=${{ github.sha }}

      - name: Migrations
        run:  |
          kamal build pull --version=${{ github.sha }}
          kamal app exec --version=${{ github.sha }} 'java -jar standalone.jar migrations'

      - name: Deploy
        run: kamal deploy --skip-push --version=${{ github.sha }}

      - name: Kamal Release
        if: ${{ cancelled() }}
        run: kamal lock release
Before the deployment we run pipeline with checking linting, formatting, outdated dependencies and tests:
jobs:
  checks:
    uses: ./.github/workflows/checks.yaml
We will see it in detail in following section.
We need to give permissions to push Docker images to the ghcr.io registry:
jobs:
  deploy:
    ...
    permissions:
      contents: read
      packages: write
For general protection against hanging steps, let's limit our pipeline to 20 minutes:
jobs:
  deploy:
    ...
    timeout-minutes: 20
Checks must be completed successfully before the deployment:
jobs:
  deploy:
    ...
    needs: [ checks ]
We use step - uses: jdx/mise-action@v2 to install Ruby and other tools. It's cached in the first run,
so usually this step should be quick.
To perform Kamal commands on the server, we need to establish an SSH connection:
jobs:
  deploy:
    steps:
      ...
      - uses: webfactory/ssh-agent@v0.9.0
        with:
          ssh-private-key: ${{ secrets.SSH_PRIVATE_KEY }}
Then we have a couple of steps for enabling Docker cache and installing Kamal.
Next, we need to push environment variables to the server using kamal envify. So, before pushing to the master branch, you have to set up secrets in the repository settings on GitHub as described in the section "CI pipeline: environment variables" above.
We split the kamal deploy command into two steps because we need to run database migrations from the CI worker before deploying the new application version. For this purpose, we use the --version argument for each deployment command.
First, build the Docker image and push it to the registry:
kamal build push --version=${{ github.sha }}
Pull the built image from the previous step and run migrations in it:
kamal build pull --version=${{ github.sha }}
kamal app exec --version=${{ github.sha }} 'java -jar standalone.jar migrations'
Perform the actual deployment of the application, but do not build an image using the --skip-push argument, because we have already built and pushed an image:
kamal deploy --skip-push --version=${{ github.sha }}
That's it. The last step is protection against failed deployments; releasing the lock to allow subsequent deployments:
kamal lock release
CI pipeline: checks
The full checks pipeline that we run on each pull-request and push to master looks like:
.github/workflows/deploy.yaml
name: Checks

on:
  pull_request:
    branches: [ master ]
  workflow_call:

jobs:
  deps:
    runs-on: ubuntu-latest
    steps:
      - uses: actions/checkout@v4
      - uses: jdx/mise-action@v2
      - name: Cache Clojure dev dependencies
        uses: actions/cache@v4
        with:
          path: ~/.m2/repository
          key: ${{ runner.os }}-clojure-dev-${{ hashFiles('**/deps.edn') }}
          restore-keys: ${{ runner.os }}-clojure-dev
      - name: Install Clojure dev deps
        run: task deps

  fmt:
    runs-on: ubuntu-latest
    needs: [ deps ]
    steps:
      - uses: actions/checkout@v4
      - uses: jdx/mise-action@v2
      - name: Fmt
        run: task fmt-check

  lint:
    runs-on: ubuntu-latest
    needs: [ deps ]
    steps:
      - uses: actions/checkout@v4
      - uses: ./.github/actions/restore-deps
      - name: Lint
        run: task lint-init && task lint

  outdated:
    runs-on: ubuntu-latest
    needs: [ deps ]
    steps:
      - uses: actions/checkout@v4
      - uses: ./.github/actions/restore-deps
      - name: Outdated deps
        run: task outdated-check

  tests:
    runs-on: ubuntu-latest
    needs: [ deps ]
    steps:
      - uses: actions/checkout@v4
      - uses: ./.github/actions/restore-deps
      - name: Run tests
        run: task test
.github/actions/restore-deps/action.yaml
name: Install deps
runs:
  using: composite
  steps:
    - uses: jdx/mise-action@v2
    - name: Restore cached clojure dev deps
      uses: actions/cache/restore@v4
      with:
        path: ~/.m2/repository
        key: ${{ runner.os }}-clojure-dev-${{ hashFiles('**/deps.edn') }}
        restore-keys: ${{ runner.os }}-clojure-dev
I'm not going to stop here too long, because the config is pretty self-descriptive.
At the first step deps we install and cache all system dependencies by uses: jdx/mise-action@v2.
The .tool-versions looks like:
task 3.34.1
java temurin-21.0.2+13.0.LTS
clojure 1.11.3.1456
node 20.13.1
cljstyle 0.16.626
clj-kondo 2024.05.24
ruby 3.3.0
So, we use the same config during development and in CI pipeline. Then we set up a cache for Clojure deps and install them:
jobs:
  deps:
    steps:
      ...
      - name: Cache Clojure dev dependencies
        uses: actions/cache@v4
        with:
          path: ~/.m2/repository
          key: ${{ runner.os }}-clojure-dev-${{ hashFiles('**/deps.edn') }}
          restore-keys: ${{ runner.os }}-clojure-dev
      - name: Install Clojure dev deps
        run: task deps
And reuse it in each step where we need cached dependencies:
jobs:
  deps:
    lint:
      ...
      - uses: ./.github/actions/restore-deps
After this step, we run the steps lint, fmt, outdated, and tests in parallel, using the cache of Clojure dependencies from the previous step. All commands are described in Taskfile.yaml:
Taskfile.yaml
tasks:
  ...
  test:
    desc: Run tests
    cmds:
      - clojure -X:dev:cljs:test

  fmt:
    desc: Fix code formatting
    cmds:
      - cljstyle fix --report {{ .DIRS }}

  lint-init:
    desc: Linting project's classpath
    cmds:
      - clj-kondo --parallel --dependencies --copy-configs --lint {{ .DIRS }}
    vars:
      DIRS:
        sh: clojure -Spath

  lint:
    desc: Linting project's code
    cmds:
      - clj-kondo --parallel --lint {{ .DIRS }}

  outdated-check:
    desc: Check outdated deps versions
    cmds:
      - clojure -M:outdated {{ .CLI_ARGS }}
  ...
Summary
I quite like the approach and the simplicity that Kamal provides for deployment. It's transparent and allows us to change almost any configuration of services. However, it would be better to have a single binary instead of installing with Ruby. Also, I would avoid an SSH connection from the CI worker to the server, but this is probably a reasonable compromise given the simplicity of the setup.
Possible improvements to the overall app installation that are out of scope for this article:
- Periodic database backup (for example, by using
postgres-backup-s3or similar). - CDN for static files.
- Non-root user in the container.
- Collecting metrics and logs.
- Using database-as-a-service instead of running our own.
The scope of this article is a bit wider than I initially planned, and I probably covered some important parts briefly or not at all. I tried to maintain a balance between not including too many details and conveying the idea of the deployment process, with the main focus on the latter. Anyway, you can always check the example repository to get more clarity. Overall, I'm happy to share a complete solution to set up and run a full-stack Clojure application. I hope it will be helpful and useful as-is, or at least serve as an inspiration for your own setup!